Using the Auto Scheduler

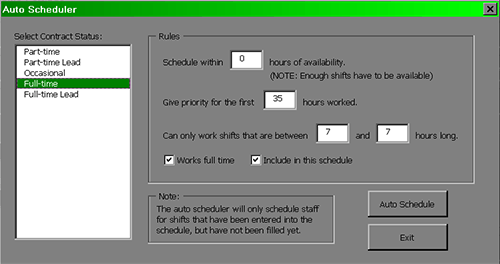
To access the Auto Scheduler click on the Settings button in the upper left corner of the spreadsheet, and then click on the Auto Scheduler button. You will be presented with a window which contains all of the rules for each type of contract status you defined in the staff editor.
You can edit the rules for each contract status by selecting from the list on the left hand side of the Auto Scheduler. When you have selected a contract status you have the option of editing the following properties:
- Schedule within X hours of availability: If you defined an employee as being available 35 hours a week, the Auto Scheduler will never schedule that person more than 35 hours per week. What the Auto Scheduler may do, however, is schedule that individual for less than 35 hours per week. By defining X you are telling Manager's Advantage to try and schedule the individual within X hours of their availability. For example, entering the number 5 would mean that it is acceptable to scheduled staff for 30-35 hours a week, but staff scheduled below 30 hours in a week would be considered underscheduled.
- Give priority for the first X hours worked: The number entered here will have a bigger impact than the number entered the above. Basically you are telling the Auto Scheduler to try and schedule each individual for at least X hours per week. If you entered the number 20, the Auto Scheduler will give shifts to staff who have not reached 20 hours worked per week before attempting to maximize the hours of other staff.
- Can only work shifts that are between X and Y hours long: Here you are simply telling the Auto Scheduler not to schedule an employee for a shift that is less than X hours or greater than Y hours in length. This is useful for making sure full-time staff are only placed into shifts that are a full day in length.
- Works full-time: Check this box if this individual is a full-time employee. The Auto Scheduler will give priority to maximizing the hours of full-time staff before others.
- Include in this schedule: Check this box if you want the Auto Scheduler to include this type of employee in the schedule. This is useful for when you want to schedule some employees manually and use the Auto Scheduler to schedule the rest.
Remember, the Auto Scheduler will only schedule staff for unfilled shifts (i.e. with a yellow background), so it won't erase any of the work you have already done on the schedule. If you want the Auto Scheduler to create a schedule from scratch you must first remove all staff from their scheduled shifts, while leaving the shifts in place. The Auto Scheduler can then schedule staff for all unfilled shifts.
Setup
MainIntroduction
Step 1: Setting up Shifts
Step 2: Setting up Staff
• Contract Status
• Lunch Break Length
• Hours Per Week
• Works Statutory Holidays
• Max Hrs/Day Before OT
• Max Hrs/Week Before OT
• Availability - Days of Week
• Vacation Days/Days Off
• Personal Days
• Lieu Days
• Extra Days Available
• Trained & Untrained Shifts
• Notes
Step 3: Setting the Schedule• Lunch Break Length
• Hours Per Week
• Works Statutory Holidays
• Max Hrs/Day Before OT
• Max Hrs/Week Before OT
• Availability - Days of Week
• Vacation Days/Days Off
• Personal Days
• Lieu Days
• Extra Days Available
• Trained & Untrained Shifts
• Notes
Making the Schedule
Deleting the ScheduleEntering a Shift
Assigning Staff to Shifts
Using the Group Editor
Cutting & Pasting
Using the Auto Scheduler
Using the Schedules View Editor
Updating the Schedule
Turning on The Log SheetRecording Late Arrivals, Etc.
Sick/Personal Days & No Shows
Adding Notes
Importing Another Schedule
Viewing the Schedule
AvailabilityColours
Hide Times/Show Times
Display Options
Schedule View & Printing
Weekly Hours
Log Sheet
Reports
