Entering a Shift

If you have "Show Times" enabled (click on the Show Times/Hide Times button in the upper left corner) you will also see the shift start & finish times in between the shift name and staff name.
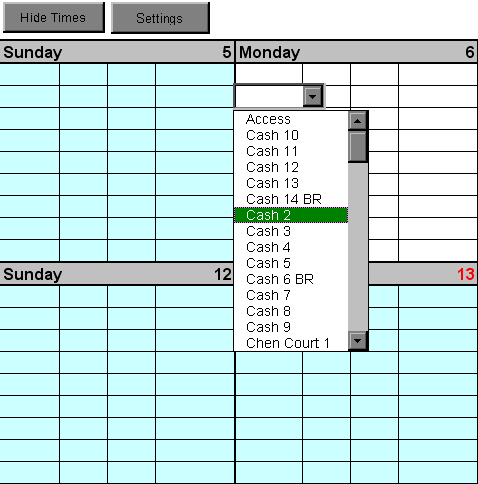
To enter a shift into the schedule, click on a cell on the left side of the day. A drop down menu will appear with all of the shifts you created listed in them. Simply choose the shift you want to use and it will automatically be entered into the schedule, along with the start and finish times you created in the shift editor.
Note: You can change the start and finish time of a shift by enabling "Show Times" (click on Show Times/Hide Times in upper left corner) and editing the times in the two columns between the shift name and staff name. A shift with no start or finish time will not count towards hours worked when staff are assigned to the shift.
Setup
MainIntroduction
Step 1: Setting up Shifts
Step 2: Setting up Staff
• Contract Status
• Lunch Break Length
• Hours Per Week
• Works Statutory Holidays
• Max Hrs/Day Before OT
• Max Hrs/Week Before OT
• Availability - Days of Week
• Vacation Days/Days Off
• Personal Days
• Lieu Days
• Extra Days Available
• Trained & Untrained Shifts
• Notes
Step 3: Setting the Schedule• Lunch Break Length
• Hours Per Week
• Works Statutory Holidays
• Max Hrs/Day Before OT
• Max Hrs/Week Before OT
• Availability - Days of Week
• Vacation Days/Days Off
• Personal Days
• Lieu Days
• Extra Days Available
• Trained & Untrained Shifts
• Notes
Making the Schedule
Deleting the ScheduleEntering a Shift
Assigning Staff to Shifts
Using the Group Editor
Cutting & Pasting
Using the Auto Scheduler
Using the Schedules View Editor
Updating the Schedule
Turning on The Log SheetRecording Late Arrivals, Etc.
Sick/Personal Days & No Shows
Adding Notes
Importing Another Schedule
Viewing the Schedule
AvailabilityColours
Hide Times/Show Times
Display Options
Schedule View & Printing
Weekly Hours
Log Sheet
Reports
