

Step 3: Setting the Schedule
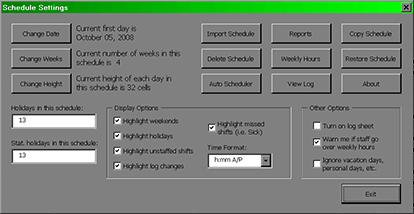
After you have set the start date of the schedule, you can indicate how many weeks you want the schedule to cover by clicking on the "Change Weeks" button. A schedule can be up to four weeks long.
You can change the height of each week in the schedule by clicking on the "Change Height" button. The higher this number is, the more cells you will have available for entering shifts into the schedule.
Note: When editing the schedule, never insert or delete rows or columns. If you want to make the schedule taller or shorter you must do so through the Settings menu.
Finally, you can enter holidays or statutory holidays into the schedule. The difference between the two is that the latter is used keep track of statutory holiday pay while the former can be used to highlight special days or holidays where employees still receive their normal pay. You can enter these dates exactly the same way as you enter vacation days.
Setup
MainIntroduction
Step 1: Setting up Shifts
Step 2: Setting up Staff
• Contract Status
• Lunch Break Length
• Hours Per Week
• Works Statutory Holidays
• Max Hrs/Day Before OT
• Max Hrs/Week Before OT
• Availability - Days of Week
• Vacation Days/Days Off
• Personal Days
• Lieu Days
• Extra Days Available
• Trained & Untrained Shifts
• Notes
Step 3: Setting the Schedule• Lunch Break Length
• Hours Per Week
• Works Statutory Holidays
• Max Hrs/Day Before OT
• Max Hrs/Week Before OT
• Availability - Days of Week
• Vacation Days/Days Off
• Personal Days
• Lieu Days
• Extra Days Available
• Trained & Untrained Shifts
• Notes
Making the Schedule
Deleting the ScheduleEntering a Shift
Assigning Staff to Shifts
Using the Group Editor
Cutting & Pasting
Using the Auto Scheduler
Using the Schedules View Editor
Updating the Schedule
Turning on The Log SheetRecording Late Arrivals, Etc.
Sick/Personal Days & No Shows
Adding Notes
Importing Another Schedule
Viewing the Schedule
AvailabilityColours
Hide Times/Show Times
Display Options
Schedule View & Printing
Weekly Hours
Log Sheet
Reports